Kitchen Appliance Covers – Odd Shapes

This is the third and final tutorial for making appliance covers for your kitchen.  Check out part 1 to make a rectangular cover, and part 2 to make a cylindrical cover.

The only other shape I could think of was the stand mixer.  What an awkward appliance to cover!  But if you make a cover like an upside-down U, it’s not so bad – I promise!

Like the other 2 tutorials, start off with your measurements:

  • Maximum circumference: the longest length you can find around the outside of the appliance (keep parallel to the counter).  This is the minimum size you need the circumference of the bottom of your cover to be in order to fit on.
  • Height: again, go for the maximum – you don’t want it to be like pants that were hemmed too high, you want those “ankles” covered!
  • Width and depth: to give you an idea of the shape.  Does not have to be exact, just pretty close (the nice thing about fabric is it bends!)
  • Any other measurements you think might be helpful: since this is just a general guideline, measure anything else you think may be useful

You’re going to make two identical pieces shaped like a U, with a width about 1″ more than the width you measured (I ended up with 8″) and a height that’s 1/4″ more than the height you measured (I cut mine to be 13.75″).  I found it easier to cut a rectangle, then round the top corners.  These will be your front and back pieces, and as before you need to cut 3 of each – 1 from outer fabric, one from batting, and one from lining fabric.

Next you need to cut a great big rectangle to sew around the U shape to finish the cover.  Measure around the curve of the U’s to get the length.  For the depth, add 1″ to your appliance depth measurement.  Just as a double check, add all of your measurements together: 2 times the rectangle depth plus 2 times the width of the U – make sure they add up to at least 1″ more than the circumference!  If it’s less, make your rectangle deeper.  I ended up with a rectangle that was 24″ deep (I can’t tell you the width because I messed it up, and didn’t actually measure it when I fixed it – oops!).

Once you have your outer fabric, lining, and batting cut out, iron the batting onto the outer fabric and quilt all 3 layers together.  Then, pin your rectangle around the curve of each of the U’s and stitch in place.  To finish it up, add your double-fold bias tape around the bottom, and that’s it!

IMG_3490 - Copy (3)

Completed stand mixer cover

This same method can be used for other shapes, too – just try to figure out what shape works best and make your own design!

As a bonus, Radar’s mom doesn’t like how hard it is to slide her stand mixer on the countertop – she keeps it in the corner, and it’s really, really hard to pull those sticky feet out to where it’s useable!  So she asked me to make a little “coaster” to keep it on that will make moving it around easier.  All I did was trace the bottom of the mixer and cut the same 3 layers out with an extra 1/4″ around my tracing.  Then I ironed the batting onto the top, put the pieces right sides together, and stitched around the edge, leaving a 3″ opening on one of the straight parts (trust me, you don’t want to try to stitch a curve shut if you can avoid it!).  Turn it right side out, quilt the pad, and then stitch around the edge with a scant 1/4″ seam allowance, turning the open edges in.

IMG_3477

Coaster for a stand mixer

And now you have a beautiful set of appliance covers to make your kitchen a more cheerful, coordinating place!

IMG_3490

I seriously love those chickens… I might have to get some of that fabric for myself!

Kitchen Appliance Covers – Cylinder

This is part 2 of a 3-part tutorial for making covers for your countertop kitchen appliances.  Check out how to make a rectangular cover here.

Another common shape for appliances is a cylinder – like a blender, juicer, or food processor.  This may actually be even easier than the rectangular tutorial… the hardest part is sewing a curve, and if you’ve got that down it’s easy peasy!

Start off by measuring your appliance, just like we did for the rectangle:

  • Maximum circumference: the longest length you can find around the outside of the appliance (keep parallel to the counter).  This is the minimum size you need the circumference of the bottom of your cover to be in order to fit on.
  • Height: again, go for the maximum – you don’t want it to be like pants that were hemmed too high, you want those “ankles” covered!
  • (Skip width and depth, it’s a circle!)
  • Any other measurements you think might be helpful: since this is just a general guideline, measure anything else you think may be useful

The math for this one is a bit scarier – you’ll have to pull out your calculator and high school geometry.  Well, sort of, because I’m going to remind you how to do it!  Divide your maximum circumference by 3.14 (you might remember, that’s pi) to get the diameter of the circle (see, the math is coming back, isn’t it?).  Add about 1″ to that diameter (1/2″ for seam allowance and 1/2″ for wiggling the cover onto your appliance).  You’ll cut a circle with a diameter of this calculated measurement.

There’s one more piece to cut.  Use the diameter of the circle you just cut, multiply by 3.14, and add 1/2″.  That will be the width of the piece that will go around.  Add 1/4″ to the height of the appliance that you measured, and that’s now tall to cut the piece.

That’s it, just 2 pieces!  As before, of each you’ll cut an outer piece, a fusible batting piece, and a lining piece.  Fuse the batting onto the exterior pieces, and quilt all 3 layers together.

Start assembling your cover by pinning the rectangular piece around the circle piece, right sides together.  Don’t worry if the ends don’t match up perfectly – it won’t make that big a difference in the finished product.  Stitch around the circle.  Then, put the right sides together of the gap in the rectangular piece and stitch from bottom to top to create a cylinder (if it gathers or puckers, you can just poke that in when the cover’s on your appliance).

IMG_3484

Sewing a curve successfully is all about pinning – a ton!

Add the extra wide double-fold bias tape around the bottom like we did with the rectangular cover, and you’re done!

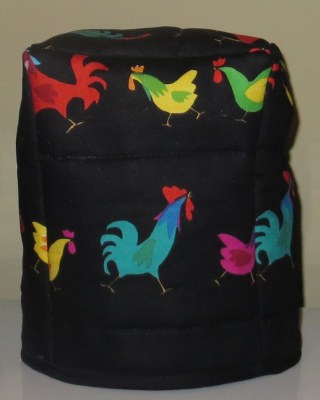
IMG_3490 - Copy (2)

I still really love those chickens

Next, check out my tutorial for odd-shaped appliance covers, like for a stand mixer.

Kitchen Appliance Covers – Rectangle

Kitchen appliances are not the most beautiful things in your house to look at.  Unless you have a show on the Food Network, they rarely match (each other or the decor), they are excellent at collecting dust and other not-so-yummy grossness, and they’re just not all that pretty when they’re not full of delicious food.  So most people want to cover them up with covers that will match the decor, keep the dust and grossness off, and look good at the same time!  Unfortunately, since every appliance is different, I can’t really provide a pattern for this tutorial.  What I will do, however, is show you how to take measurements of your appliances, turn that into your own unique pattern, and then make your own unique covers!

I will warn you – there will be some thinking involved in this process.  So I don’t want anyone yelling at me because math was involved!  But with some very basic drawing (I believe I’ve mentioned that I can barely draw a stick figure, so don’t worry, it’s not complicated!) and labeling, you should be able to tackle this problem without too much difficulty.  I do, however, recommend keeping a calculator handy, just in case!

Radar’s mom asked me to make covers for her electric can opener, blender, and KitchenAid stand mixer, which conveniently all have different but typical shapes.  There are three posts:

The easiest is by far the rectangular cover.  We will start off by measuring, which will be the same for all three tutorials.

Take the following measurements:

  • Maximum circumference: the longest length you can find around the outside of the appliance (keep parallel to the counter).  This is the minimum size you need the circumference of the bottom of your cover to be in order to fit on.
  • Height: again, go for the maximum – you don’t want it to be like pants that were hemmed too high, you want those “ankles” covered!
  • Width and depth: to give you an idea of the shape.  Does not have to be exact, just pretty close (the nice thing about fabric is it bends!)
  • Any other measurements you think might be helpful: since this is just a general guideline, measure anything else you think may be useful

Now that you’re armed with your measurements, it’s time to do the math.  Draw a general picture of what you want the cover to look like.  In the case of the rectangular cover, I drew a box (very much NOT to scale!).  In my case, the can opener measured 4.5″ wide, 4.25″ deep, and 8.5″ tall with a 23″ circumference (it actually sticks out a little at the back, but a rectangle will keep it covered nicely).  Add about 1″ to your width measurement to get your cover width (1/2″ for seam allowance and 1/2″ for wiggle room getting the cover on and off).  Add about 1″ to your depth measurement to get your cover depth (same principle).  Only add 1/4″ to your height measurement – as we said before, we want it to perfectly meet the counter, not be too long or too short.  The 1/4″ will cover the seam allowance at the top.

The cover will consist of 5 pieces:

  • 1 top piece (width x height)
  • 2 side pieces (depth x height)
  • 2 front/back pieces (width x depth)

But it’s not just made from the fabric that matches your kitchen.  You’ll want to add a layer of batting (I prefer fusible, and fuse it to the outer fabric for a clean finish) and a layer of lining to cover the batting.  I used the same fabric for the lining as the outside, just didn’t pay as close attention to the direction.

Once your outer fabric, batting, and lining are all cut out (and the batting is attached to the outer pieces), you’ll want to “quilt” your fabric.  If you know how to free-motion quilt, go for it!  I do not, sadly (it’s on my to-do list to learn how), but the fabric that my mother-in-law chose was super easy – I just stitched lines between the rows of the chickens (aren’t they super cute and festive, by the way??).

IMG_3476

Quilted pieces, ready to put together

Now it’s time to start sewing it together.  I opted to use my serger because it makes a nice finished edge, but as usual, you can use a regular straight stitch on a sewing machine.  Seam allowances should all be 1/4″.

Start by sewing the top to the sides – pay attention to which side is inside and which is outside!  Place right sides together for this step.  Then sew the front and back onto the top as well, creating a plus sign.

Top And Sides

Left: Sides attached to top. Right: All parts attached to top.

The next step is to stitch the sides up – it’s not too hard.  You may have to play with it a little to make everything line up, but if you measured your fabric right it shouldn’t be too bad.

IMG_3480

Starting to look like an appliance cover; you can see I didn’t pay attention to how the fabric laid on the interior – because who cares??

Now it’s time to finish off the bottom.  Turn the cover right side out and pin extra wide double-fold bias tape around the bottom, overlapping from the starting point and folding in the raw edge.  A quick note here on the bias tape you buy at the store.  It’s actually not folded in half – one edge is slightly wider than the other:

IMG_3491

See how the bottom section sticks up above the top side?

Put the longer side on the inside of the cover so you can be sure to catch the back side of the tape when you’re stitching on the right side.  Stitch all the way around and you’re finished with your cover!

IMG_3490 - Copy

Rectangular appliance cover complete!

Monster thought it was just HILARIOUS to wear it like a hat… it made Peach laugh too!

IMG_3481Use the links at the top to check out my other tutorials for different shapes of appliance covers!